Hi! In Outer Wonders, our slippery-maze-based adventure game, the storyline will be an important part of the game. In order to tell this story, a scripting tool assisting us in creating content such as cutscenes is key. But how are such tools implemented? This week's blog post will tell you more about this!
The point of visual scripting
There are many ways to implement scripting inside a game or a game engine. Most game studios use, either the tools provided by existing game engines (Unity features C#-based scripting, Unreal Engine features C++-based scripting, Godot features GDScript-based scripting, etc.), or script-oriented programming languages such as Lua or, more seldom, JavaScript and Python.
An alternate way to implement scripting consists in setting up visual scripting, which can be particularly useful in the context of a custom game engine. Visual scripting consists in designing scripts without having to learn a programming language first! For instance, educational tool Scratch can be seen as visual scripting engine, as it grants its community the ability to create programs in a completely visual way.
Let's take the following cutscene as an example.
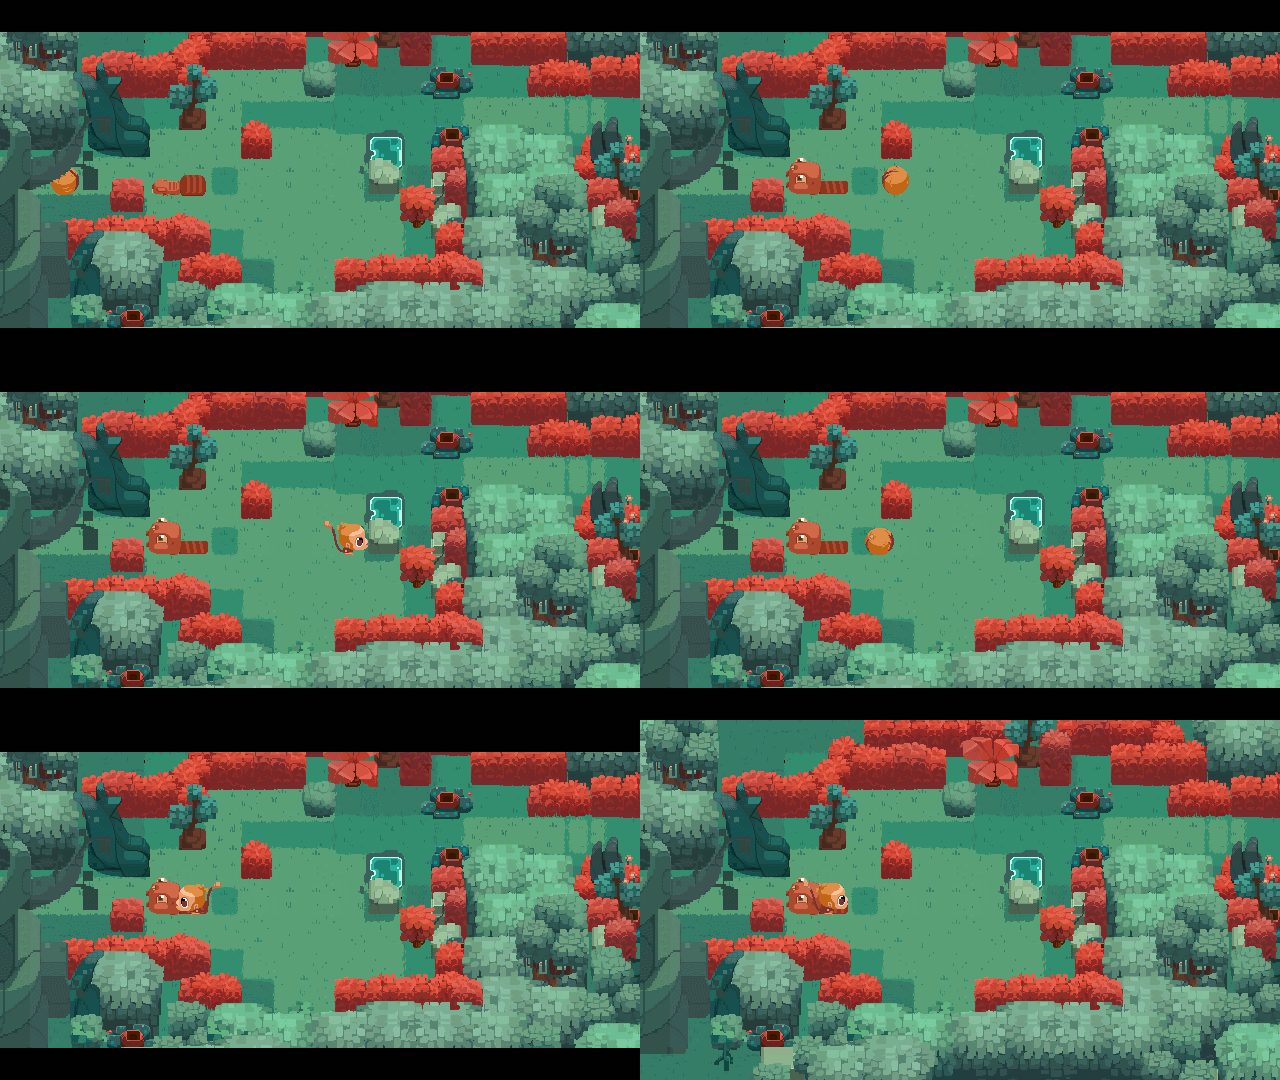
This cutscene can be illustrated using the following visual script.
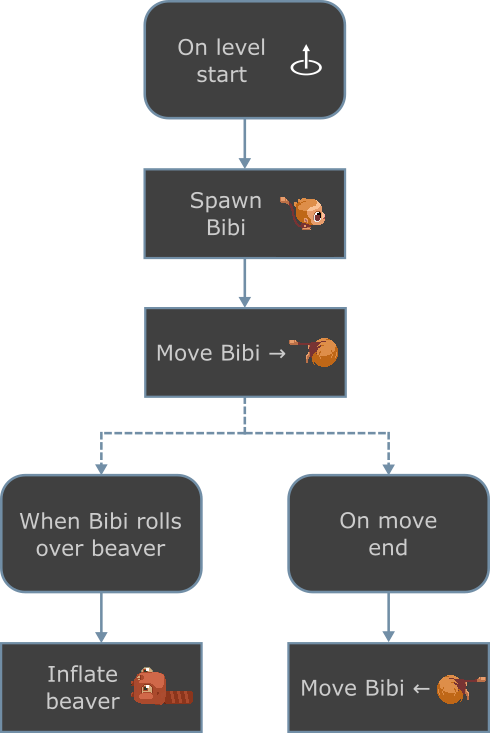
This is what visual scripting is about: setting up scripted events in a easily visualizable way. Actually, we even went further than that.
An even more visual way of scripting
Another way of depicting the previous cutscene would consist in breaking it into 3 steps first:
- Bibi spawns.
- Bibi moves to the right: upon rolling on the beaver, Bibi causes it to become bloated (step 2a), before continuing on its way until it reaches the rock (step 2b).
- Bibi comes back to the left until it reaches the beaver again, which puts this last move to an end.
These steps can be depicted visually using symbols included in the scene, as shown below.
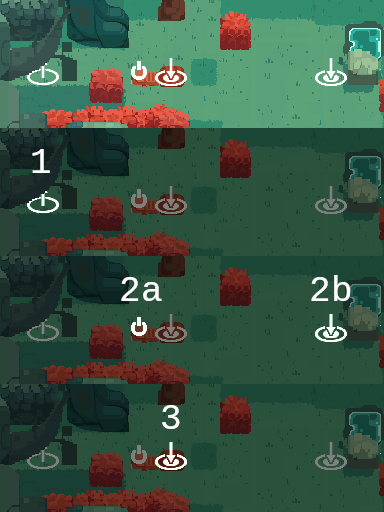
With this setup, the person in charge of designing the cutscene can have a clearer view of the cutscene and where each of its steps takes place.
These symbols, or, rather, these entities as we call them, symbolize actions to be carried out. Entities can be placed inside a level and connected together using our level editor.
The example below shows how we set up the level's spawn to have Bibi start moving to the right at the beginning of the level.
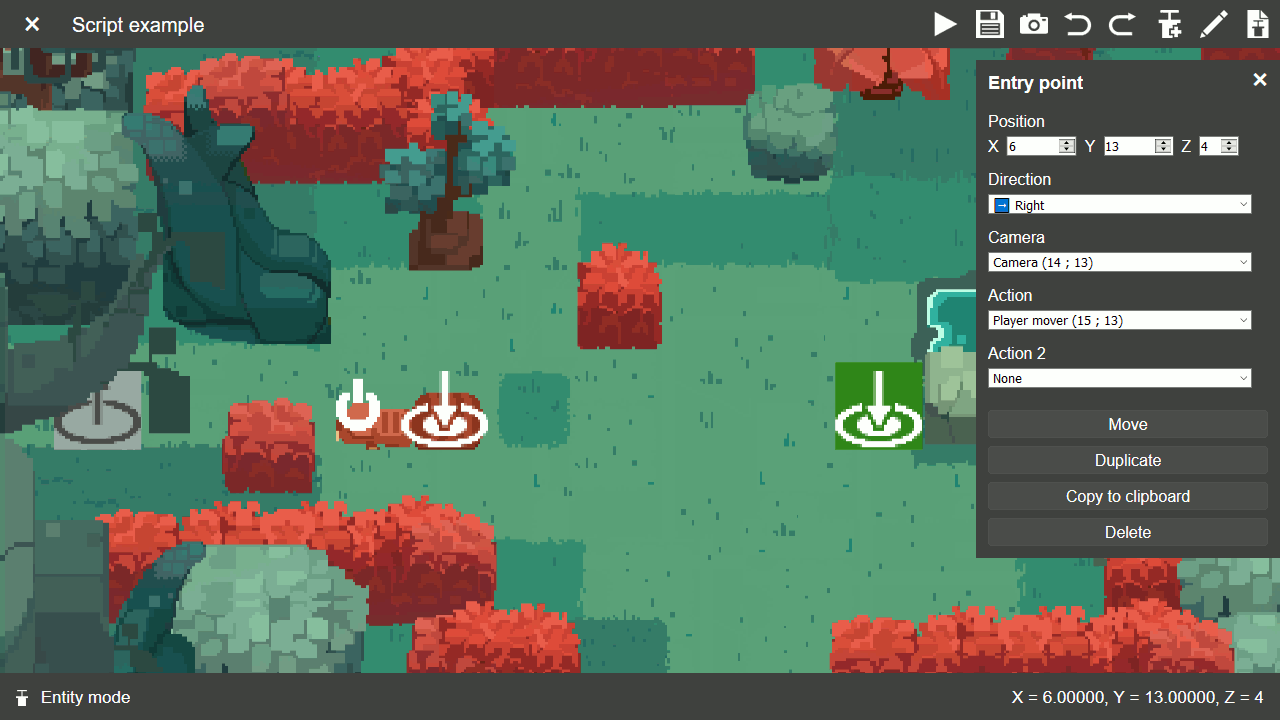
This tool is inspired by early versions of the Serious Editor, which is the level editor that players of the popular Serious Sam games can use to design levels, and has successfully been used by our team to set up game logic, as well as cutscenes.
Under the hood: executing scripts using Rust
Setting the actions to be performed using the level editor is one thing, but being able to actually execute them inside the game is another one. Explaining the exact way our script execution backend works would be complex and beyond the scope of this blog post; however, let's get into how its essential components works, albeit in a simplified way, in case you are interested in programming. If you are not, we recommend that you skip this rather lengthy part of the blog post.
First of all, scripts are basically a set of actions to be executed. This means we need to implement the concept of action inside our code.
We could intuitively start by defining an ActionKind enumeration, as follows:
pub enum ActionKind {
	MovePlayer {
		destination_x: u16,
		destination_y: u16
	},
	ReplaceSprite {
		// SpriteID is a variable type identifying
		// a sprite inside the scene.
		sprite_id_to_replace: SpriteID,
		// SpriteAssetID is a variable type identifying
		// a sprite asset among the sprite types
		// exposed by the game, e.g. "beaver".
		sprite_new_asset_id: SpriteAssetID
	},
	// Other action types...
}
We will have to complete this definition at a later stage. In our example cutscene, some actions have to be performed "simultaneously". For example, when Bibi starts moving to the right, the script does not wait for Bibi's move to come to an end before performing other actions; once Bibi rolls over the beaver, the script will execute an action causing the beaver to become bloated. Yet, at this stage, Bibi is still moving to the right! This concept of "simultaneous" execution is referred to as asynchronous execution.
We can also describe this type of execution as event-driven, which means that some actions will be carried out only once a particular event occurs (even if we cannot predict when it happens). For instance, once Bibi rolls over the beaver, the beaver becomes bloated.
Several things are necessary for a scripting system to expose such features:
- a means of detecting when events occur. For example, how can we be notified about Bibi reaching the tile where the beaver is? And how can we be notified about Bibi's move to the right coming to an end?
- some way of connecting these events and the actions they trigger.
In order to achieve this, we can set up a structure which, for each a the level's tiles, will hold the action that rolling over this tile will trigger.
pub struct TileActionGrid {
	// Array of "width × height" entries, each of them
	// holds a potential action to execute once Bibi rolls over
	// the matching tile.
	tile_actions: Vec<Option<ActionKind>>
}
When Bibi reaches a given tile, we can just retrieve the matching action from this structure and execute it.
Actually, we implemented our system in a more flexible way. Once Bibi starts a move, we are capable of computing the exact instant when Bibi reaches the beaver, as well as the exact instant when Bibi's move comes to an end. We set up a queue holding actions to execute, along with their execution timestamp, as illustrated by the timeline below. Once a move begins, actions triggered by rolling over the tiles are added to this queue.
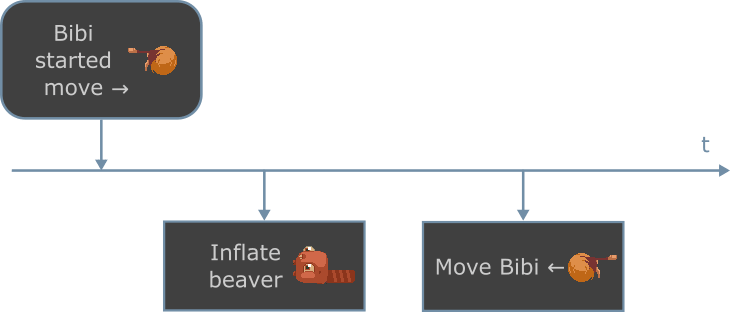
In terms of code, this can be implemented using the following Action and ActionQueue structures depicting respectively an action with an associated timestamp, and a FIFO queue of such actions:
pub struct Action {
	pub kind: ActionKind,
	pub execution_instant: Instant
}

pub struct ActionQueue {
	actions: VecDeque<Action>
}

impl ActionQueue {
	pub fn new() -> ActionQueue {
		ActionQueue {
			actions: VecDeque::new()
		}
	}

	pub fn add_action(&mut self, action: Action) {
		// A binary search would be more efficient here.
		let index = self.actions.iter()
			.position(|already_queued_action| already_queued_action.execution_instant > action.execution_instant)
			.unwrap_or(self.actions.len());
		self.actions.insert(index, action);
	}

	pub fn poll_action(&mut self, instant: Instant) -> Option<Action> {
		if self.actions.front()?.execution_instant <= instant {
			Some(self.actions.pop_front().unwrap())
		} else {
			None
		}
	}
}
Starting a move triggers a prediction algorithm which adds potential future actions to the queue using the ActionQueue::add_action method. Also, each frame, the engine polls the queue for pending actions to be executed using the ActionQueue::poll_action method. Actions will be returned by the queue and executed only once their execution instant (Action's execution_instant field) has been reached.
There is one problem left to solve. As previously described, our scripts will sometimes include actions to be performed once some specific events occur. However, actions themselves can trigger events as well. In our cutscene example, Bibi's move to the right triggers a differed event (the end of said move), causing another action (move to the left this time) to be executed. This means that sometimes, actions will need to be able to reference other actions! It is therefore tempting to redefine the ActionKind enumeration roughly as follows:
pub enum ActionKind<'a> {
	MovePlayer {
		destination_x: u16,
		destination_y: u16,
		maybe_end_action: Option<&'a ActionKind<'a>>
	},
	ReplaceSprite {
		sprite_id_to_replace: SpriteID,
		sprite_new_asset_id: SpriteAssetID
	},
	// Other action types...
}
Rust's compiler will not compile such code, though. Generally speaking, Rust will not allow an action to keep a direct reference to another action durably; trying to do so will cause the compiler to fail due to not complying with the rules of the borrow checker, a safety checker inside the Rust compiler that aims to ensure that your application will not access memory in a potentially hazardous way.
This is why, when a level is loaded, all of the triggerable actions are stored inside a pool of actions, and, in order to reference actions in a safer way, we use identifiers (numbers), rather than direct references. Such identifiers can then be used to look up actions inside the pool.
With this in mind, we can now define our ActionKind enumeration properly. The following code defines an ActionPool structure depicting the pool of actions, redefines our ActionKind enumeration, and then defines an ActionExecutionContext structure that will actually execute actions.
pub struct ActionPool {
	actions: Vec<ActionKind>
}

impl ActionPool {
	#[inline]
	pub fn get_action(&self, action_id: ActionID) -> Option<&ActionKind> {
		self.actions.get(action_id)
	}
}

pub type ActionID = usize;

#[derive(Clone)]
pub enum ActionKind {
	MovePlayer {
		destination_x: u16,
		destination_y: u16,
		maybe_end_action_id: Option<ActionID>
	},
	ReplaceSprite {
		sprite_id_to_replace: SpriteID,
		sprite_new_asset_id: SpriteAssetID
	},
	// Other action types...
}

pub struct ActionExecutionContext<'a> {
	pub instant: Instant,
	pub action_pool: &'a ActionPool,
	pub action_queue: &'a mut ActionQueue,
	pub player: &'a mut Player,
	// Other variables that an action could require...
}

impl<'a> ActionExecutionContext<'a> {
	pub fn execute_pending_actions(&mut self) {
		while let Some(action) = self.action_queue.poll_action(self.instant) {
			match action.kind {
				ActionKind::MovePlayer {destination_x, destination_y, maybe_end_action_id} => {
					// start_player_move is an external function
					// that... starts a player move.
					let move_duration: Duration = start_player_move(self.player, destination_x, destination_y);
					if let Some(end_action_kind) = maybe_end_action_id.and_then(|end_action_id| self.action_pool.get_action(end_action_id)) {
						self.action_queue.add_action(Action {
							kind: end_action_kind.clone(),
							execution_instant: action.execution_instant + move_duration
						});
					}
				}
				ActionKind::ReplaceSprite {sprite_id_to_replace, sprite_new_asset_id} => {
					// Replace sprite.
				},
				// Other action types...
			}
		}
	}
}
Now, we can create an ActionExecutionContext instance every frame and call its execute_pending_actions method in order to check for pending actions of which execution instants have been reached, and perform these actions. Our script action execution system is now set up and can perform sequences of actions!
And this concludes this blog post! Follow us on Twitter, Facebook and Instagram to read our news and play weekly puzzles! Subscribe to our RSS feed to keep informed about our latest blog posts. A Discord community server is also on the way.
See you soon!

